


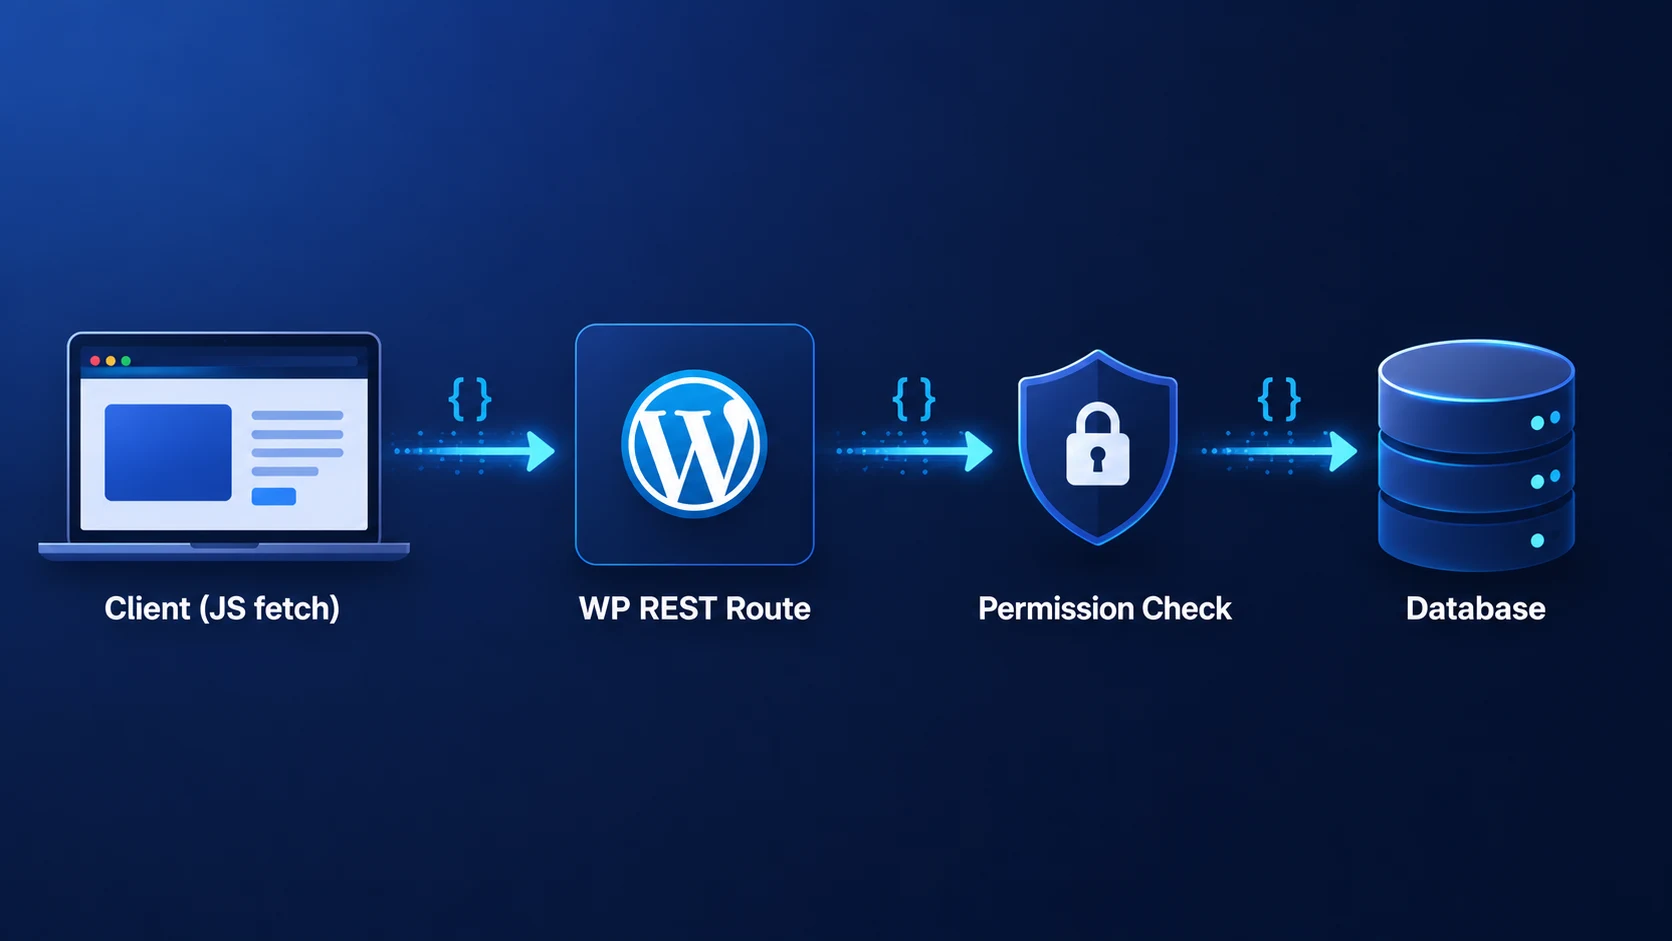
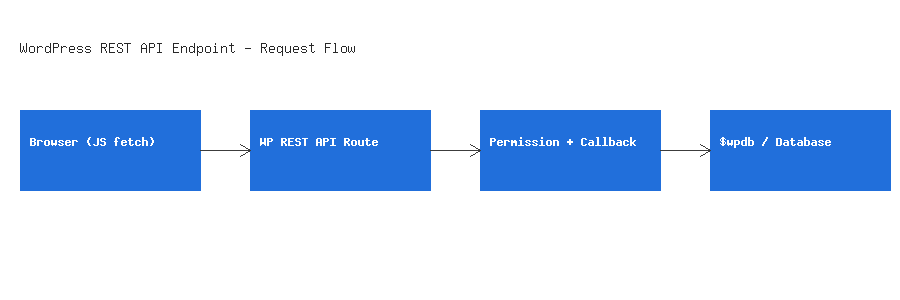
A custom WordPress REST API endpoint gives your plugin or theme a clean, secure way to expose data to JavaScript, a mobile app, or a third-party service — without querying the database directly from the front end. WordPress has shipped a full REST API in core since version 4.7, powering everything from the block editor itself to headless front ends. This guide goes beyond a quick example: it covers the full lifecycle of a production-ready custom endpoint, including security pitfalls, performance considerations, versioning, and testing.
What the WordPress REST API Actually Is
The REST API is a layer built into WordPress core that exposes site data as JSON over standard HTTP methods (GET, POST, PUT, DELETE). Every route lives under /wp-json/, namespaced by plugin or feature — for example, core’s own routes live under wp/v2. When you register a custom route, you’re extending this same system, not building something separate from it.
Why You’d Want a Custom WordPress REST API Endpoint
The default routes cover posts, pages, users, taxonomies, and a handful of other core objects, but they don’t know anything about your plugin’s custom database tables, your specific business logic, or the exact shape of data your front end needs. A dedicated endpoint lets you:
- Shape the request and response exactly the way your JavaScript or mobile app expects, instead of over-fetching from a generic route
- Apply your own permission rules per action, rather than relying on WordPress’s built-in capability checks alone
- Keep your underlying database structure private — consumers of the API never need to know your table or column names
- Combine data from multiple sources (custom tables, post meta, external APIs) into a single response, reducing round trips
This becomes especially important if you’re building toward a headless WordPress setup, where a JavaScript framework like React or Next.js is the only consumer of your data — every piece of content the visitor sees has to travel through an endpoint like the ones covered here.
1. Register the Route
Custom endpoints are registered on the rest_api_init hook using register_rest_route(). This function takes three arguments: a namespace, a route pattern, and an args array describing the endpoint’s behavior.
add_action('rest_api_init', function () {
    register_rest_route('wpwebguru/v1', '/subscribers', [
        'methods'             => 'GET',
        'callback'            => 'wpwebguru_get_subscribers',
        'permission_callback' => 'wpwebguru_check_permission',
        'args'                => [
            'status' => [
                'default'           => 'active',
                'sanitize_callback' => 'sanitize_text_field',
            ],
        ],
    ]);
});
Note: Always namespace your routes as vendor-slug/v1. This prevents collisions with core routes and with other plugins, and gives you a clean way to introduce breaking changes later as v2 without touching existing consumers.
2. Never Skip the Permission Callback
A missing permission_callback throws a deprecation notice in modern WordPress and, worse, can silently expose data publicly by accident. Be explicit about who can call the endpoint and under what conditions.
function wpwebguru_check_permission(WP_REST_Request $request) {
    // Example: only logged-in users with 'manage_options'
    return current_user_can('manage_options');
}

// For public but rate-limited endpoints, verify a nonce instead:
function wpwebguru_check_public_permission(WP_REST_Request $request) {
    return wp_verify_nonce($request->get_header('X-WP-Nonce'), 'wp_rest');
}
Warning: Setting 'permission_callback' => '__return_true' makes an endpoint fully public with no authentication check at all. That’s fine for genuinely public data, but it’s one of the most common ways plugins accidentally leak private data — audit every __return_true permission callback in your codebase and confirm the underlying data is meant to be public. This is exactly the kind of gap covered in our WordPress security checklist, particularly the section on REST API user enumeration.
3. Write the Callback
The callback receives a WP_REST_Request object and should return a WP_REST_Response (or a WP_Error on failure) rather than echoing raw data or calling wp_die().
function wpwebguru_get_subscribers(WP_REST_Request $request) {
    global $wpdb;

    $status = $request->get_param('status');

    $rows = $wpdb->get_results(
        $wpdb->prepare(
            "SELECT id, email, status FROM {$wpdb->prefix}subscribers WHERE status = %s",
            $status
        )
    );

    if ($rows === null) {
        return new WP_Error('db_error', 'Could not fetch subscribers', ['status' => 500]);
    }

    return new WP_REST_Response($rows, 200);
}
Note: Always use $wpdb->prepare() for any query that includes a variable, exactly as shown above. String-concatenating request parameters directly into SQL is the single most common source of SQL injection vulnerabilities in WordPress plugins. See our SQL query optimization guide for more on writing safe, efficient $wpdb queries.
Useful methods on WP_REST_Request worth knowing: get_param() reads a single value from query string, URL, or body (in that priority order); get_json_params() reads only the JSON body; get_header() reads request headers like X-WP-Nonce or Authorization.
4. Call It from JavaScript
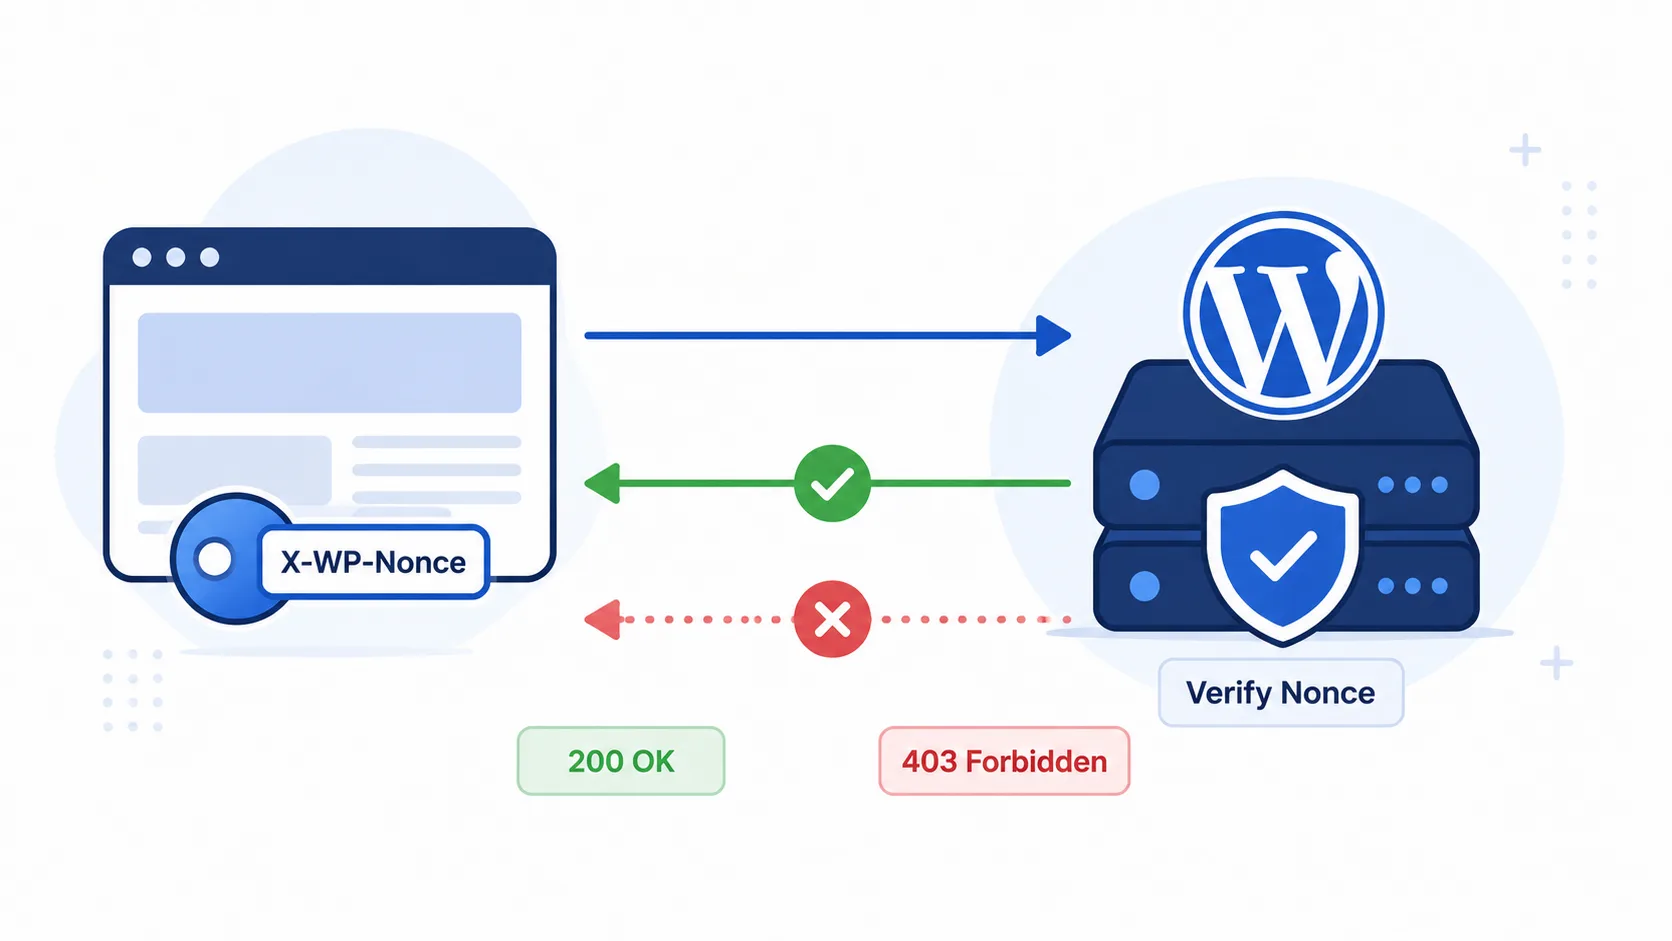
On the front end, use fetch() with the REST nonce that WordPress localizes for you. Always send the X-WP-Nonce header for authenticated requests, or the server will reject them once the user’s session cookie is checked against it.
// PHP: localize the nonce and REST URL for your script
wp_localize_script('wpwebguru-app', 'wpwebguruAPI', [
    'root'  => esc_url_raw(rest_url('wpwebguru/v1/')),
    'nonce' => wp_create_nonce('wp_rest'),
]);
// JS: fetch subscribers
async function loadSubscribers(status = 'active') {
const response = await fetch(
`${wpwebguruAPI.root}subscribers?status=${status}`,
{
headers: {
'X-WP-Nonce': wpwebguruAPI.nonce,
},
}
);
if (!response.ok) {
console.error('Request failed:', response.status);
return [];
}
return await response.json();
}Warning: REST nonces expire after roughly 12–24 hours (tied to the logged-in session). On a long-lived single-page view, a stale nonce will start returning 403 rest_cookie_invalid_nonce errors. Either refresh the page periodically, or fetch a fresh nonce via a lightweight endpoint if your app stays open for long sessions.
5. Validate and Sanitize Every Argument
The args array in register_rest_route() isn’t optional boilerplate — it’s where WordPress validates and sanitizes incoming data before your callback ever runs, which means bad input never reaches your database query.
'args' => [
    'email' => [
        'required'          => true,
        'validate_callback' => function ($value) {
            return is_email($value) !== false;
        },
        'sanitize_callback' => 'sanitize_email',
    ],
],
Note: validate_callback and sanitize_callback serve different purposes — validation decides whether to reject the request outright (returning a 400 error automatically), while sanitization cleans up otherwise-valid input before it reaches your callback. Use both together rather than relying on sanitization alone to silently “fix” bad input.
6. Think About Caching and Rate Limiting
A custom endpoint that runs an expensive database query on every request can become a performance bottleneck once real traffic hits it. Two practical mitigations:
- Cache the response with a transient (see the caching pattern in our SQL optimization guide) when the underlying data doesn’t need to be real-time.
- Rate-limit expensive or public endpoints so a single client (or bot) can’t hammer your database. A simple approach is tracking request counts per IP in a transient and returning a
429 Too Many RequestsWP_Erroronce a threshold is exceeded.
7. Version Your API from Day One
Notice the v1 in wpwebguru/v1 from step one — that’s not decorative. Once external code depends on your endpoint’s response shape, changing it is a breaking change. When you need to change behavior incompatibly, register a new wpwebguru/v2 namespace and support both versions during a transition period rather than silently altering v1 under everyone’s feet.
Testing Your WordPress REST API Endpoint
Before wiring up the front end, confirm the endpoint behaves correctly on its own. You can hit it directly in the browser for GET requests, or use a tool like Postman or curl for POST/PUT/DELETE. Check three things: the HTTP status code matches what you expect, the response body has the shape your JavaScript expects, and unauthenticated requests are actually rejected by your permission callback. It’s worth reading through the official WordPress REST API Handbook for the full list of response and schema conventions core itself follows — matching those conventions makes your endpoint feel native to anyone consuming it. The register_rest_route() function reference and the WP_Error class reference are also worth bookmarking while you work.

Common Mistakes to Avoid
- Echoing data directly instead of returning a WP_REST_Response. This bypasses WordPress’s response formatting and can break clients expecting proper JSON headers.
- Trusting
$_GETor$_POSTdirectly instead of$request->get_param(). The request object handles parameter priority and works consistently whether the client sends query params, URL params, or a JSON body. - Forgetting CORS headers if your endpoint needs to be called from a different domain (common in headless setups) — the default REST API doesn’t send permissive CORS headers by default.
- Not handling the
WP_Errorcase in JavaScript. A failed permission check still returns a JSON body with an error code; checkresponse.okor the HTTP status, not just whether the response parsed as JSON.
Wrapping Up
A custom WordPress REST API endpoint is really four decisions: where it lives (namespace/route/version), who can call it (permission callback), what it accepts (args with validation/sanitization), and what it returns (a proper WP_REST_Response). Get those four right, add caching and rate limiting where it matters, and the endpoint will behave predictably whether it’s called from your own JS, a mobile app, or a third-party integration. If you’re also optimizing the queries running behind an endpoint like this, our guide on SQL query optimization for WordPress developers is a natural next read, and if you’re building toward a fully decoupled front end, see our guide on headless WordPress in 2026. Before shipping any public-facing endpoint, run through our WordPress security checklist as well — an API is only as safe as its weakest permission callback.




10 replies on “WordPress REST API Endpoint: 5 Steps to a Secure, Custom Route”
[…] also exposing custom data through your own endpoints, pair this checklist with our guide on building a custom WordPress REST API endpoint to make sure your own routes are locked down […]
[…] most of the benefit with far less infrastructure to maintain. If you do go headless, revisit your custom REST API endpoint patterns and your WordPress security checklist together — an API-only backend has a different […]
[…] pattern clicks, it scales to far more complex blocks — the same approach powers things like custom REST API-backed blocks that pull live data into the editor. If you’re building blocks for a commercial plugin, keep […]
[…] through your own API rather than a theme template, the same taxonomy functions work well inside a custom REST API endpoint, and if you’re building a reusable category-list block for the editor instead of a template […]
[…] time, exactly as shown in the corrected code above; it’s the same habit that matters in a custom REST API endpoint or anywhere else user-supplied data flows through your site. For the full official reference on […]
[…] Proper server-side authentication for genuinely private content — the same access-control principles covered in our WordPress security checklist, and the same permission-callback pattern used in a custom REST API endpoint. […]
[…] signed URL or token generated server-side after the form processes — a good use case for a custom REST API endpoint that issues a one-time download link rather than exposing a permanent static path. For a general […]
[…] site is also exposing media through a custom API, the same sanitize-on-input principle applies to a custom REST API endpoint handling file uploads, not just the native WordPress media […]
[…] front end rather than a PHP template, the same wp_trim_words() approach works well inside a custom REST API endpoint that returns a trimmed summary field alongside the full […]
[…] and you won’t be able to query, create, or update movies through /wp-json/wp/v2/movies or any custom REST API endpoint that expects standard REST support. This is one of the most common, easy-to-miss omissions in older […]